

Fixing Zoom meeting room to your own personal meeting ID

– Make sure ‘Enable Personal Meeting ID’ is enabled.
– Make sure ‘Use Personal Meeting ID (PMI) when scheduling a meeting’ is enabled.
– Make sure ‘Personal Meeting ID (PMI) when starting an instant meeting’ is enabled.

Use full-screen mode while using screen-sharing
When using the ‘screen-share’ feature to show the coursebook or Epic! storybooks, please ensure it is in the full-screen mode.
Otherwise, the letters will be too small and such letters are not legible for students.
For windows, you can simply press F11 to make the window appear in the full-screen mode.
The keyboard shortcut Control + Command + F can be used for For Mac OS.
Recording video call sessions in Zoom
- Cloud recording is only available for paid users and students only use the free version. So, the recording should be made through the local recording (saving the video call in the hard drive).
- Students should be allowed to record the lesson in the zoom software or no recording will occur.
- Recording lessons on your own are recommended because you will need them to become a ‘premium’ tutor. Additionally, if you can show the progress of a student’s improvement it will be a great marketing tool to get more students.
- Instruction and details can be found at https://support.zoom.us/hc/en-us/articles/201362473-Local-Recording
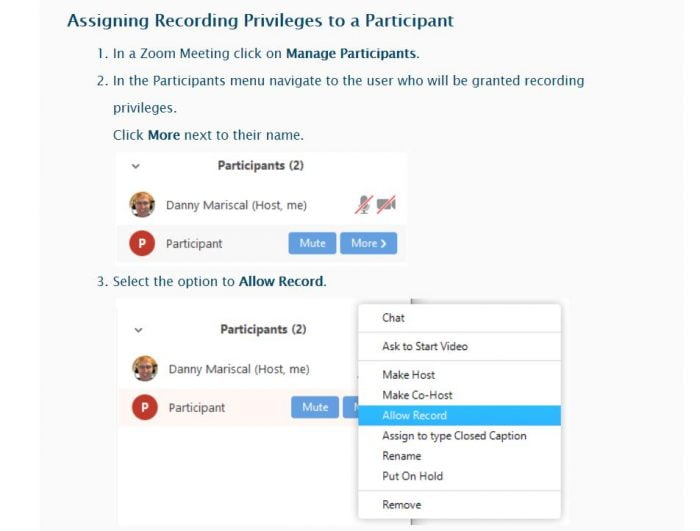
Assigning Recording Privileges to a Participant
At default, your students can’t record the lesson. You should either
- let your student initiate the video call so they can record the video call as a host.
- assign recording privileges to your students ( check the explanation below )
Annotation as a Viewer (for students)
Students can annotate on a shared screen as a viewer. This will enhance the participation and interaction of your student. The tools available will vary based on the version of the Zoom desktop client or mobile app and your device type, but participants can draw and highlight on the screen share.
To learn how to share your screen or annotate on your own shared screen, see How Do I Share My Screen?
Prerequisites
- Zoom Desktop Client
- Zoom Mobile App
- Meeting with screen sharing
Note: The meeting host can disable attendee annotation. If you do not have the annotation option, confirm that the host has not disabled annotation.
Useful tool for screensharing – annotation from student’s side
If your student uses ‘annotation’ feature in Zoom, they can interact with you in ‘sharedscreen’
They can point, draw or type on the shared screen
So they can fill in the blank, or circle on the screen etc.
Check this page for further details: https://support.zoom.us/hc/en-us/articles/115005706806-Annotation-as-a-Viewer
It shows the instruction of how they can participate with annotation